Do It Yourself Shack - a site for simple do it yourself type projects, how to tutorials, reviews and more.

Wednesday, March 17, 2010

Introduction

What was that great advice your dad used to give you? That's right, if you want something done right, you have to DO IT YOURSELF ! That is the premise of this entire site along with providing a sounding board for ideas and methods that we use to accomplish this end. I hope that some of the articles here will also inspire you to vary the theme and come up with your own ideas on how to use common every day items and materials to do uncommon things. There must be one thousand and one uses for Duct Tape, and I am certain that you can make it one thousand and two. So experiment, look at things in a different way, and share your insights with us here at Do It Yourself Shack. Your idea or input, could inspire the next user, and so on and so forth. And if an idea or concept doesn't work out like you plan, not to worry, just chalk it up as a learning experience and go on to your next one. You will be more successful with each attempt. Why not keep a notepad with you to jot down some of the ideas you might have during the course of a day, because you will find the more you think like this, the more ideas you will have. If you don't record them, you may forget a really good one !

Some of the things you will find here:
  • Projects for things you might want to try to DO IT YOURSELF ( practicality is a variable :)
  • Things that were made for one thing, but you can use for something else.
  • How To use readily available things to achieve a certain end result.
  • Tools ( what you will find useful )
  • Miscellaneous (  that should cover anything else that I might add :)
Some things you won't find here:
  • Extremely flashy web appearance ( I am not a web designer .... can you tell? But I will strive for usability :)
Now, about the DO IT YOURSELF philosophy that I subscribe to. Know when to do it yourself, and know when not to. Always try to weigh the risks involved in doing something yourself. For example, if all you know about automobile brakes are that they stop your car when you push the pedal, then I recommend that you don't try to repair them yourself. But on the other hand if you can save a little money and have a little fun, without taking undue risks, then by all means... DO IT YOURSELF. Sure this analogy might fall more into a repair situation than a true DIY, but the point is don't do anything stupid.

There is Nothing Like Mountain Spring Water

By Dale Bishop
Usually the hard part of a project like this is finding the water.  For us that was easy.  I have been on this farm for 10 years and have never seen this spot dry.


 We just dug down until we found a small trickle of water coming out of the ground.  We then placed the collector in the bottom of the hole we had dug.
The small pipe on the left goes directly to the spot we found the trickle of water.  We came out of the right side with 3” PVC out to the water tank.


 We filled in around all that with 14 tons of 2” gravel and placed a steel cap over our collector.   We took the dirt removed from the hole and piled it around the uphill side of the spring to prevent surface water from getting into our spring.  This ensures that only ground water makes it to the tank.


After that it was just a matter of running the pipe down the hill to our existing plumbing.


Thanks to my good friend Dale for sending this to the site.
Dale is a good buddy, PC Guy, and Amateur Backhoe operator :)


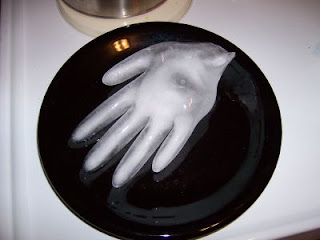
Halloweens Icy Hand of Death for your party punch bowl !

OK, so your planning your annual Halloween bash, and you are looking for something different to do this year. How about adding the Icy Hand of Death for  your party punch?
You need latex surgical gloves for your Icy mold. I recommend that you rinse the glove(s) thoroughly with scalding hot water a few times to remove any powder or additives that might be in the gloves you use. I don't have to tell you to use new sterile gloves do I?.  You can purchase these at any pharmacy in town by the box and they are handy for other things too, so it doesn't hurt to have them around.
After rinsing thoroughly, fill the glove to just a little above the thumb line on as the water will expand some as it freezes. After the glove is filled to the right level use clothes pins to secure the glove in an upright position to the freezer door tray in your refrigerator. Other options are to tie the glove closed and lay the glove over and object and place in the freezer. This will give the effect of the hand clinching or grabbing. I am sure if you think on it awhile, other ideas will occur to you. Please resist the urge to position the glove in any offensive juvenile gestures, as you are being childish enough in even doing this. If a punch party is not what you had in mind, I think you might even fill your hand with Koolaid, insert a stick into the wrist, and come out with a truly unique frozen confection. I shiver to think what might happen with jello and a latex glove.
Freeze overnight for best effect. To remove the glove from the hand run a little tap water over the glove surface. Then just peel the glove off of your Icy Hand and place in your punch bowl.


Many Thanks to Mr. Dingus for this chilling idea :)


Zip Lock Bag Omelette

This is one of those how to's that you can find references to everywhere, but I will include a short version of my own. If you have never tried this method, you should. Great for the kids too!
I don't like to cook much, but eating is another story. Sometimes cooking can be a really fun experience, but most often these days I prefer the quick and easy. This little item fits the bill perfectly. I would file this item in my bachelor chow recipes.
You need your favorite ingredients for an omelette. I typically use about 2 tablespoons of grated or shredded cheese, and a little cubed ham. Suit your tastes with the type of cheese and fillings you prefer.
2 Eggs are about right for me. Go for 3 if you prefer a little larger omelette.
1 Zip lock type Freezer bag (sandwich size).
1 Sauce pan of water (boiling)
Beat the eggs thoroughly and add to zip lock bag. Some people like a little milk or butter added, so go ahead be creative.
Add your additional ingredients (Cheese, ham, etc) to the beaten eggs in the bag. Try to remove most of the air from the Zip lock bag, then seal.
Drop the bag into the bowling water for about 13 minutes.
Remove the bag from the boiling water carefully so as not to burn yourself, open the Zip lock bag and your now finished omelette will slide right out onto your plate. Season with salt and pepper or what have you and enjoy. Another plus for these omelettes is you can prepare several and cook all at the same time, and have all ready simultaneously.
Clean up is a breeze. This always makes a good breakfast item for a campsite if your the outdoors type too. No pictures have been included in this how to, because you really don't want to see my kitchen :)


Video Monitoring with Yahoo Messenger

You may have a need to monitor your home or office remotely. You will need a webcam at the location you wish to monitor and a computer with a always on internet connection. Logitech is still my favorite webcam but there are many on the market, so choose one that fits your budget and tastes. Install the required software and drivers for the camera of your choice and insure that it is operating correctly.
You need two Yahoo accounts and Yahoo messenger. One account will monitor and the other will transmit. Make sure each account has the other account in its user list so you can see it online. At the transmit location log onto  Yahoo Messenger with the account that will transmit. Set the preferences in Yahoo messenger to NOT display the 'view my webcam' message. This will keep the random users from trying to access the camera. Also set in the Yahoo preferences to always accept incoming video requests from the Yahoo ID(s) that you will use to view from. That does the setup part, so now just launch your webcam from Yahoo messenger and your ready to go. You can set your screensaver to password protected to prevent someone from shutting it down, and turn off your monitor.
Now from the viewing location, logon to the Yahoo messenger account that will monitor. You should see the transmitting Yahoo ID in your list. Right click that user name and select view webcam from the dropdown menu. That's all there is to it, for quick and easy monitoring on the cheap!

Automatic Panning Fan Cam

This is more of a concept how to, and you can apply to many different devices but with the same end results. Take one small table top oscillating fan and one Linksys WVC11B 802.11 Wireless camera and combine them. As a concept though it doesn't have to be restricted to a table top fan, as any oscillating type fan would work just as well. The same can be said for the camera, a wireless  camera reduces your wire management, but a wired camera can work just as well. And as you will notice I am sure, this is not designed for stealth, but for functionality.
Now as your fan and camera my vary, use what you have on hand. What your going to achieve is a camera that will pan from side to side in the arc of the fan oscillation. Why... well because you can? Seriously you may want to set a cam to pan an area for surveillance or just a every day web cam. Be creative in what you use it for, as well as how you affix the cam to the fan. I used a large rubber band, but I can see this being done with duct tape, Velcro, wire ties etc. However you mount the camera to the fan, just insure it is secure, and will not fall off during normal fan operation.
BONUS: Most oscillating fans will be multi-speed, so you may have a choice of panning speeds.
DOUBLE BONUS: You get some cooling and air flow from the fan.
See the below video link for a sample of what it looks like in motion.

Media Streaming

OK, you got stuff ... right? And you can't always take it with you cause its anchored down at home. I'm not talking about Mp3 content, or video... there are lots of portable solutions for that, but more like, radios, cameras, microphones, telephones and on and on. Stuff that you might monitor at home and would like to be able to monitor while away from home. Here is the solution I use frequently.
Windows Media Encoder can be downloaded from Microsoft for free, and will let you customize a streaming solution for what ever content you want to deliver to the web. A case in point and what I will use as an example, is my Uniden Bearcat 245XLT  Trunk Tracking Scanner that I monitor, along with some of my friends and family. Nothing very interesting to listen to, unless a local situation arises and its nice to have the public service channels available so you can stay on top of the situation.
Of course you have to install Windows Media Encoder series 9 to your Windows 2000 or XP computer. In my case with the police scanner I feed the audio output from the headphone jack of the scanner to the line input of the sound card with a standard audio cable and adjust the audio output of the scanner to about 1/3 volume. Now fire up Windows Media Encoder from your computer. It will launch the setup wizard, and this is where you customize for your needs. I am not going to cover all the configuration steps, but just a few that I feel are important.
In my case broadcasting a public service scanner, I choose live event. As the setup wizard precedes, I select audio only and the default audio device. For Broadcast method select pull from encoder, and select a port number to broadcast on. The application will find a free port for you if you wish. Whatever port you choose, remember you will have to open this port on your firewall and or router to make this stream available outside of your network.
The Encoding options are next. My recommendations here are to chose the lowest quality setting that are acceptable to you. In my case with a police scanner I use the voice quality audio and 11KBs stream, but you may want to do otherwise. Remember the higher the quality the more bandwidth need for output and reception. Police scanner audio is typically pretty poor anyway so voice quality is fine for this.
During the remainder of the wizard setup you will have the opportunity to name the stream, restrict access, archive the stream to a file, and a few other miscellaneous settings. Chose whatever works best for you, and remember you can always go back and experiment with the settings till you have them to your liking. You may have to adjust the audio properties in your computer configuration to get the best output. While you adjust the properties of the audio pay particular attention to the meter in Windows Media Encoder, and adjust so the sound level is upper range but not peaking or clipping. Once you do have the settings tweaked to your preferences save the session, and you can launch from that in the future so that you don't have to configure each time. See its really pretty easy and it works like a champ.
Here's the link to my scanner feed for you to sample. What you will hear is the Sullivan County Tennessee 800 mhz Pubic Service Trunk Tracking system. It's pretty boring stuff most of the time, unless there is a catastrophe or crime going on but your welcome to listen.
Connecting to your stream is easy. For inside your network, just plug mms://xxx.xxx.xxx.xxx:zzzz into your browser address field, and it should launch Windows media player. Substitute the x's above for your network IP address, and the z's with the port number you selected earlier. To connect outside of your network you have to use the IP address that you get from your ISP and the port you selected, or use a dynamic DNS service to point a hostname to your IP address. There are several dynamic DNS services that are free, and some for pay. I use http://www.dyndns.com which offers both free and pay service. Their documentation is simple and gets you going right away. With a dynamic DNS name you can then connect to your stream from any internet location with a name instead of and IP address.
You can launch this stream from within your preferred players instead of a browser, by telling the player to open a URL, and plug in your address information.
I have used Windows Media encoder for cameras, telephones, satellite radio etc. Most anything that provides an audio or visual output can be configured to stream this way. And in addition, media files that you have stored on your computer can be streamed in the same method, just choose the appropriate configuration in the setup wizard and you can figure out the rest easily.

Home Automation

For several years now I have taken spells of dabbling with Home Automation. Here is what I have found and some of my experiences.
I first developed an interest in this stuff when I discovered X10 technology. You probably know the stuff I'm talking about, but if not you can read about it here. In my early forays into this technology I used X10
control modules with stand alone timer/controllers and that worked pretty well at an elementary level. You can get into this for around 50$ startup, and purchase one of the Active Home Kits to see if its for you.
I really wanted more control, and a little more intelligence on these devices so I started searching for computer interfaces and software. I've settled on the CM11A controller that comes in serial or USB interface. This unit is included with the Active Home setup kit from X-10. Over the years I've also acquired numerous light modules, appliance modules, socket rockets, and motion sensors that use X10. My requirements are not extremely complicated, I just need to control lamps on a schedule and by motion, with local control and web based control.
There is quite a bit of software that is designed for this hardware and to accomplish what I had in mind. I will discuss two of them. My first choice and still a favorite is an open source project called MisterHouse. The developers have done a fine job with this code, and I was enthralled with it for some time. There is quite a bit of functionality built into the MisterHouse, but I always stumbled when I had to modify the perl code, to customize for my individual needs. I'm just not a programmer, and I never pretend to be. I have rudimentary knowledge of several programming languages, and that's all I want to have thank you :) MisterHouse does have all that I needed though, including speech technology. So if you're geeker than I and enjoy perl programming, then this is the package for you. I applaud the developers on a nice piece of work, and hope they continue.
I am now using HomeSeer, a commercial product that has matured over the years and works very nicely. I now have a nice easy computer interface, that will let me put together complicated macros and scripts all in a Windows GUI interface. Web control is good, and it has all the bells and whistles I will probably ever need, and no programming involved. Homeseer will announce sunrise and sunsets, motion detection and control all the X10 modules I can throw at it. If you want to quickly go into X10 home automation, this is my choice... but be advised that it is expensive, but justifiable if you need or want reliable X10 home automation.
 
Building a motorized bicycle
Back in the summer of 2008, I decided to put together a motorized bicycle. Of course gas prices in and around the 4$ per gallon range influenced me to look into this. After a bit of studying on this, and looking around to see what was available, this is what I struck upon. Realistically, and not counting my labor, I have about 275$ dollars into this, but you could get by much cheaper if you already have an existing bike to use.
I chose to buy and off the rack Walmart Bike for 99$. Pictured to the right is the bicycle just after I got it home. It's model type was a Kulana Moondog. The orange and black theme along with the Cruiser style wide handlebars and big street tires would blend with the engine kit I had decided upon. This kit was a black engine with black teardrop gas tank I purchased off e-bay for 148$. The engine is a 50CC 2 Cycle gasoline. A 2 cycle engines will require oil to be mixed with your fuel.
The engine kit was produced in China and of acceptable quality for my expectations, which were not extremely high. When buying an engine of this type you will need to be at least somewhat handy with a few tools to install it , as it probably will require some tinkering around with to get it to fit correctly. Using hindsight upon this build, the job would be easier if you went for the simplest bike frame possible. A bike frame with small and straight diameter tubes of about 1.5 in. would be the best choice.
Your first major task is to mount the drive sprocket to the rear wheel. Remove the rear wheel to begin. On the left hand side of the wheel mount your drive sprocket to the outside of the spokes centered on the hub. The drive sprocket is held to the spokes using a segmented ring and bolts that mount on the inside of the spoke ring. Be as precise as you can be on centering this drive sprocket, then remount your rear wheel, just as you disassembled it earlier.
Next mount the engine to the frame as per its included instructions. Since the frame of my bike was bigger than the included mounting bracket, I modified the mounting using a 2 inch muffler clamp. mount it tightly to the frame and in the same plane as the drive sprocket on your rear wheel. This will lessen the stress on your drive chain by getting this alignment as close as possible.
With the engine in place you can mount the gas tank to the bicycle top tube, being careful it is positioned to not interfere with your steering or your ability to pedal. I purchased some rubber fuel line and a inline lawnmower gas filter at the local AutoZone, to replace the clear rubber tubing that came with the kit. 

Modification using 2" muffler clamp

Replaced fuel line and gas filter with engine and tank mounted


Left hand clutch lever and right handle bar throttle installed

Drive Chain installed and rear fender nibbled out for clearance


Kulana Moondog with 50 cc engine kit assembled


Short clip of engine at idle


Conclusion Motorized Bicycle Build
Mount your throttle assembly on the right hand side of the handle bar and your clutch lever on the left hand side of the bar. Secure each associated cable to your bike and route them to your engine and connect them as per the manufactures instructions.
Mount your drive chain to your engine drive sprocket and to your rear drive sprocket. After you have installed your chain, bolt the chain tensioner that comes with your kit to the bottom tube and adjust so you have one to two inches of slack in your chain. I had to nibble out some metal of the rear fender of this bike to accommodate the drive chain path.
Be sure to mix your gasoline with 2 cycle engine oil. I used about a 40:1 ratio of gas to oil.
Double check all your connections and fittings to make sure they look right and won't come loose. With the tank fueled open the fuel line valve to allow the gas to get to the engine. On your first starting attempt you will need to let the gas have some time to get to the engine. If you installed a clear filter like I did you will see the flow if it is working.
You start the bike by either pedaling or coasting to get some speed and momentum going while having the clutch engaged. When you get to 5-10 mph dis-engage the clutch to start the engine. I recommend after starting the first time to immediately engage the clutch again, park the bike with the engine running and examine everything again closely. Check your throttle, your ignition kill switch. When you feel comfortable that everything is as it should be venture off in an area with little or no traffic to get accustomed to starting, stopping and maneuvering.
You will need several test runs more than likely to get everything adjusted as you like it. The most important thing to get right early on is the correct drive chain tension and alignment. Nothing is more frustrating than the chain coming off track or broken.
Once I had the bugs out of mine, I could get a top speed of about 27 mph and was able to climb normal rolling hills without pedal assist. On the very steep hills pedaling to assist the engine was required, but did not require a huge amount of effort. I am really unsure of the mileage of this little engine but I would imagine you would get well over 100mpg easily.
So do your homework, find a bike you want to try this on, and shop around the internet looking for an engine. 50 and 70 cc engines of this type are easily found and purchased via ebay. You probably won't use this all the time but you will have fun puttering around on it. Wear a helmet and stay safe


Hide your small valuables away in plain sight, with this DIY Phonebook Safe

I am sure you throw away or recycle your old phone book every year or so. I came across a 2004 edition just today, and decided to put it to another use. With a few hours time, some wax paper, wood glue, a jig saw, drill, and a few bricks you can too.

Start by taking two sheets of wax paper that are a few inches longer than the phone book. You will insert one sheet of paper about 20 pages from the front of the book, and the other 20 pages from the rear of the book. Slide the wax paper sheets so they are all the way back against the binding and extending around the other three edges of the book. Now close the book and position the book on the edge of a surface so that you can paint the wood glue onto the book, and where the excess glue wont damage anything. I used my trusty outdoor picnic table, as seen here before.

With the book positioned on the edge of the table and  a large cinder block compressing the book, I paint the wood glue between the areas that are isolated by the wax paper, along all three unbound edges of the book. Apply the glue so that it covers all of the edges but not so much that it is dripping.  Now go fix some coffee, and enjoy a few cups and come back an hour later. After an hour the glue has had time to dry and you can remove the cinderblock and extract the wax paper sheets. Use an box cutter type knife or razor blade to trim the edges where the wax paper might be sticking. With this done you will have a center portion of the book that is now almost board like, with some loose pages before and after it. As you can see, Sally the DIY cat is on the job too.


I used a ruler to mark an area on the inside that is approximately an inch and half from all edges. With this square outlined, and the loose pages folded back, drill through each corner of the outline you just made. These drill holes will be the starting points for your jigsaw. With your saw now carefully cut from drill hole to drill hole until the entire center section of the book is free. There is a lot of paper dust from all of this so this is definitely best done out doors. Throw away the loose pages and clean up the dust you have made before you go on.
Now prepare the book for more glue by lying it on another sheet of wax paper, with the bottom of the book down and closed. The top of the book will remain open. You now need to paint the inside edges with the wood glue, compress with bricks, and then paint the exterior edges one more time. This will bond the back of the book to the cut out portion. Have some more coffee and come back in an hour. Remove the wax paper, trim any rough edge material with your knife and you are done.

Now you can stash you small valuables or what have you in a easy to reach book on your night stand, telephone table, or book shelf. This technique should work just as well on hard bound books also.


License Plate Tool Tote

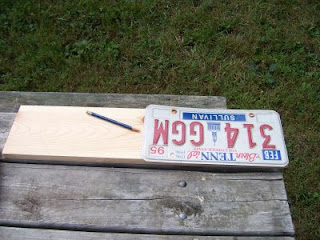
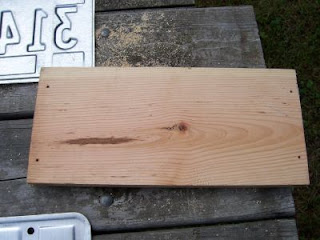
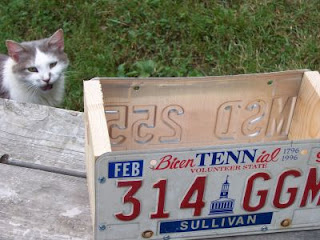
So what do you do with those old license plates after they expire or you get rid of a car? Sure you could can toss them, or maybe you live in a state where you have to turn them back in. I found myself we several of them on hand so here is one idea. Needed are (2) plates, one board 24"x6"x1", a handful of wood screws and a couple of short bungee cords.
 
 
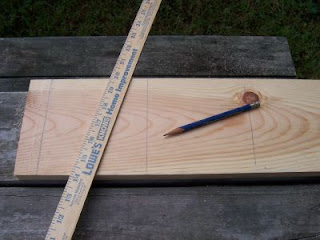
Measure your first cut on the board with a license plate itself. This is the bottom of your tool tote. The plates I have are 6"x12" and suppose that is standard for all states.
 
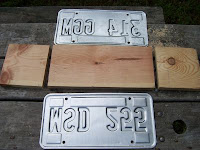
 Next to cut the sides, account for the thickness of your board (3/4") in my case, subtract that from height of the plates. So with that said I now made two more cut marks 5 1/4" each apart. If your components differ then calculate accordingly. Make your cuts and you will now have the bottom and sides complete


Now prepare the bottom of your tote by drilling two holes along each edge that will support a side. Set these holes approximately an inch from the long edge and 3/8" from the short edge. This is where the screws that support the sides will be placed.


Now that you have the bottom holes drilled ,set each side in place and use flush mount type wood screws to secure each side to the bottom. If you want to add wood glue at this joint then please do before attaching the sides to the bottom. It's not necessary, but it won't hurt either.
Now prepare the license plates to attach to this bottom and side structure by punching with a nail. You need at least 2 punches per edge. I did six. They were spaced about 1 1/2" on the short edges and about 3 inches along the bottom edge. After punching use your drill and open the holes up to accommodate your screws that will secure each side. Place the plates in their proper locations while drilling to prepare the side and bottom simultaneously.
 
After all holes have been drilled then secure each plate to the side with the remaining screws. Make sure each screw sets well and pulls the plate flush with the side or bottom. That is Sally in the picture to the right, helping out like she often does, and admiring my handy work.


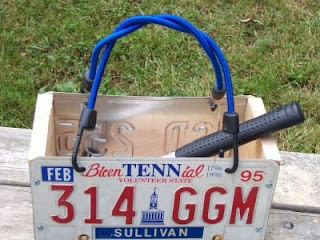
Next for the handles, I opted for two 18 inch bungees, twisted together and inserted into the top mounting holes of each plate. If I put this in my truck bed or trunk of my car, then I often need a bungee so this can serve double duty. You can use other options for a handle, from an old belt to duct tape, whatever works best for you.  So now I have a tool tote that is uniquely mine, reflective at night and can be traced back to me through the Department of Motor Vehicles.

VW Beetle Door Panel Replacement

The simplicity and clean design of the original Volkswagen Beetle is still one of the attractions I have to this car. Even with today's modern designs and technology, its still nice to get in a basic car and enjoy the drive, the feel of the road and the simpler times ( at least for 30 minutes or so, lol ).
I have a 1974 Sunbug, and decided to dress up the insides a little. Believe me I still have more to do, and you will probably see more of her here, so this is not likely the last VW project I will do.


The stock door panels are fiberboard and covered with a vinyl, and for the most part are OK, but I was adding a new stereo and needed to cut new speaker openings in the door panels. Rather than mess up the originals, I purchased two 2ft. X 4ft. Oak panels 1/4 inch thick from the local Lowes. This is plenty to make the panels and with enough left over for the dash (future project). I also needed some Oak stain, to darken the wood a little and protect it some. Other items needed are a jigsaw, drill with 3/8 and 1/2 inch bit, sandpaper, steel wool (fine) Phillips screwdriver, pencil and yardstick. Oh yeah a old CD, maybe one of those AOL CD's you've been saving.
Take your Philips screwdriver, and remove the hardware from the door. The door handle cover, the arm rest, and the window arm. Not much there to remove, and stow your pieces in the floor board of the beetle. The door panel is held in place with a bunch of metal fasteners that just pop out of the door with a little pressure. Pop one corner and work your way around till you have them all lose and the panel removed.
Next you will do a tracing of this panel on the oak panels. Lay the oak panel on a work surface and align the door panel with one of the corners of the oak panel. Since the VW panel is rectangular with rounded corners, doing this takes care of two cuts for you. Trace carefully around the outside, and the four holes on the interior of the panel. That wasn't to hard now was it? You can trace both oak panels from one door panel as they are identical, just mirrored images of one another. With the tracings done, cut careful along your trace lines with the jigsaw until you have the blank oak panels free. This is a good time to sand the edges all the way around your wood panels just to smooth any roughness out. If you were careful they will be pretty smooth and not require a lot of additional finishing.

Now take your drill with a 3/8 bit and drill out the two holes for the arm rest. Use the 1/2 bit for the window arm hole. Drill a hole somewhere close to the inside tracings of the door handle to accommodate your jigsaw bit, as you will have to saw this opening. You can work your jigsaw from the hole to the inside of the tracing and cut out this opening, using care as you turn those corners with the saw. If your not adding speakers that's all the cuts and drills you have to do. Since I was adding 5 inch speakers to the door, I noticed that a CD was the perfect size for these speakers to fit into, so that is what I used for my tracing. I measured 5 1/2 inches back from the front edge of the panel and 4 1/4 inches up from the bottom for the center of my speakers. Making an X there I placed the CD centered on the X and traced the circle around it.  If your speakers are a different size, then you need to reposition this cutout so adjust accordingly. Drill another hole close to the inside of this circle to accommodate the jigsaw, and then cut the hole out carefully. Use this cut for a tracing on your second panel and they will be identical.
I smoothed out any rough spots with sandpaper and steel wool, removed all the dust from the wood with a damp cloth and when dry applied 2 coats of a golden colored oak stain to the wood. Let the first coat dry before applying the second.
When the stain was dry, I mounted the speakers with the hardware that was included, to the new wooden panels. That's it, the panels are ready to install back in the car. Connect the speaker wires to each speaker, and mount all the hardware back on to the door, to hold the panel in place. Since you are not using the original retaining clips, you will need either a nylon type fastener or screw and anchor to hold at least one point  to the door at the rear edge of the panel. Otherwise it will not bow inward enough and will leave a slight gap there. You may also wish to do the same on the front edge of the panel.
I like the looks of the wood and the new speakers really improve the new stereos sound. This was a entire day project, but a lot of the time was spent waiting for the stain to dry and drinking coffee. So if you have an old bug, or know someone that does.... you might want to try this out.

DIY-Shack Duct Tape Can Cooler

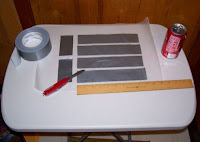
For the Duct Tape Can Cooler your going to need a few minutes, some duct tape and your Swiss army knife. For more precision work include the optional ruler and wax paper. This ain't rocket science so you can improvise if you have to for measurements. Oh yeah, you need a can, for your form.
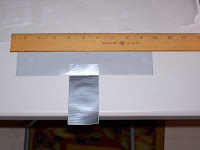
1. Cut four pieces of Duct Tape at least 9 inches long. This will wrap around most common cans. Cut two pieces about 4 inches long, and this will make the bottom. The bottom is optional as you really only need side covers, so skip the bottom section if you wish. No bottom, skip to step 4. Place these strips on your wax paper for easy handling.

2. If your going to make a bottom, now stick the two 4 each pieces together, adhesive to adhesive. This can be a little tricky, so use your ruler to hold on piece down and lay the other pieces smoothly on top of that one. Remove ruler, smooth the tape and bend on end at about 3/4 of and inch at 90 degrees.


3. If your including the bottom now's the time to stick it to one of your 9 inch strips. Stick the bent area flush with one side of the tape, in the approximate middle. Use your ruler here again to help hold the tape at bay.


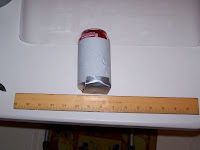
4. Now roll the 9 inch strip around your can with adhesive side out around the can, using the bottom as a guide so you will wrap straight. Wrap all the way around and overlap the tape. You get extra points for neatness here.


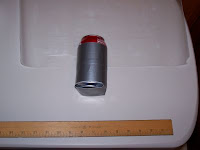
5. Wrap a second 9 inch strip around the can and overlapping the first wrap slightly, all the way around the can overlapping on the end again. After the wrap, fold your bottom over and secure to the other side.


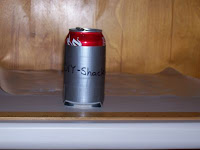
6. Take your third and fourth strips now and repeat steps 4 and 5, but with the adhesive to adhesive. Take your time and things will work out smoothly. If you want to add additional strips to improve the insulation factor, then by all means do it now, and add all you want. Colored Duct Tape would also brighten things up a bit, but I prefer the battleship gray. You can decorate as you like, like a decorative skull and cross bones or maybe just your name in  laundry marker. Be creative... and besides its just Duct Tape.


As you can see, mine sports a fashionable DIY-Shack Logo, and please feel free to do the same to yours :)
These fold flat when your not using them, so put them under your car visor to take along with you. And as with most things duct tape, they are quite durable. You will probably lose it or have it stolen before you wear it out.
Cheers :)

DIY-Shack Ribbon Cable Belt

 OK, here's a quick project that will definitely add the geek look to your wardrobe. You will need only a few items and about 15 minutes of time.
Get a military type belt buckle, the kind that you feed the belt end thru and is kept in place by a small sliding mechanism. If you don't already have one somewhere, find one in a budget store, usually with a canvas belt attached for a few dollars. For your belt you will also need enough 25 conductor ribbon cable to wrap around your middle, plus a little extra. Use an old belt that you might have that fits to get a correct length and cut your ribbon cable to that length plus and additional 10 inches. You can buy this cable by the foot or spool, in a standard gray color, and sometimes a rainbow color scheme at most computer or electronic supply stores. If you are truly a geek you have some on hand already!
After you cut your ribbon cable to the correct length, fold about 3 inches of one end back over on itself. This is the end you will place the buckle on. These military type buckles have a small toothed clamp on the underside that secures the buckle to the belt. Feed the folded end of your ribbon cable in to this clamp and extending to about the end of the buckle. Clamp the buckle to the cable. Now test your new belt for fit by folding the other end upon itself and inserting into the buckle. In the case its to long, just trim the free end with a good pair of shears. If its to short, unclamp the buckle for the belt and shorten the folded area and re-clamp the buckle.
I really don't have to tell you I am sure, but this is not for formal attire. The only people your likely to impress will be the ubergeeks and techno weenies that you hang out with. Hmmmm, Ok now I'm thinking watchbands for calculator watches ...